- Home
- Latest
- Building Q&As
- Boat Launch
Bolger Dory Type V in a week
by Zach
(Saint Joseph Mi)

Part 2
The Launch
Dear people, I have a question about building a boat.
My daughter had a week between school and camp and I asked what she wanted to do.
I expected her to ask to go to an amusement park or something but she replied "I want to build a boat!"
She apparently read "small boats" by Phil Bolger and she desperately wants to have rowing adventures this summer in a dory.
So we got started.
In 4 days we had all the ribs assembled on the jig, built the stem and stern things, and had the ply ready for planking the sides up.
I was fitting the sides when I realized that something was wrong.
We had reversed the last form on each end of the boat!
I switched them around but now the elevations are wrong.
I think the diff is 50 or 60mm but I don't have the book in front of me.
Here is my question: Will this significantly change the way the boat rows?
Right now it's much more of a double ender than a dory style boat but I know that Bolger tended to use lots of curve in his bottoms anyway so will this be a show stopper?
It will break my little girl's heart if we have to go back and redo the stem/stern and recut the sides but I don't want to finish the boat if it's going to cause more heartache.
The stem and stern are pretty thin at the bottom now but I can still drive a screw into them and I plan on sistering some wood in around them against the first frame in case anyone is wondering.
I'm also going to do a layer of fiberglass.
Comments for Bolger Dory Type V in a week
|
||
|
||
|
||
Bolger Dory Part 2
by Zach
(Saint Joseph Mi)
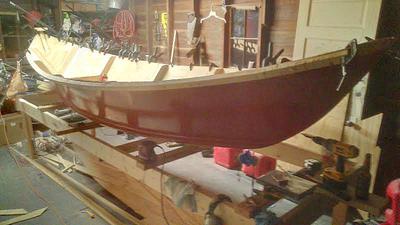
Mike,
Please find attached a few more photos of the dory project.
I hope they serve to inspire another foolish man to build a boat with his kid! ;)
Currently on week #8.
I would say weekends working hard 8+ hours Saturday and Sunday with the learning curve.
You can see us bending the gunnels with a turkey fryer steam setup as seen on YouTube "Tips from a shipwright." ( How to steam bend wooden boat frames in plastic bags instead of a traditional steam box )
This didn't bend the ends of the boards enough so I had to think fast and kerf the ends to get them to bend before the epoxy kicked.
That was Saturday at 1AM.
I also have another dilemma... which end is the front?
Darn double enders! (first world problems) I think the wider end will be the back now.
Painted with oil/poly porch paint and coated with three coats of epoxy and one 6 oz. glass.
I used SC110 epoxy resin purchased on Amazon and it appears to be pretty good (takes a while to cure but wets out well and sets up hard).
Fasteners used were stainless deck screws from Ace Hardware - 1 5/8".
This may be a problem in the future but they appear to work even if they're fussy and a little soft.
Is there are rule for where to put the oarlocks?
That's the next fiasco.
Thanks for your website, it was helpful!
Current cost is around 600 - 700$ including epoxy.
I could have done it for 4 - 500 if I knew what I was doing, or bought a plastic one for 300 HAHA.
The memories are priceless though.
You can see a couple pics of kiddo working away and being awesome.
We will christen this boat "Ginger Cat" by the end of the week.
Comments for Bolger Dory Part 2
|
||
|
||
|
||
|
||
|
||
Boat Launch
by Zach
(Saint Joseph Mi)
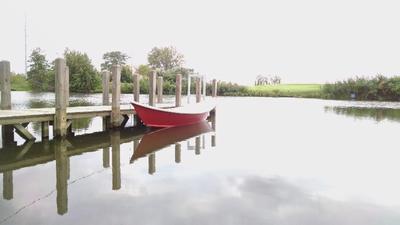
Mike! Have to finish the story...I would say rowing is certainly an art.
This morning I feel like I was beat up by apes - but we got her in the water and christened her with coconut rum.
Fitting we thought.
Poseidon will certainly not forget the day we launched. 
My impression of this dory is that it certainly is tender and wants to pull its head either way with current or wind.
It took lots of getting used to.
The river looks smooth but there was enough current to turn the boat fairly quickly.
She appears to float as intended.
Since we mixed up the second and fourth frames I was concerned that she would not float correctly, so we positioned the forward rowing position in the widest part of the boat hoping to get it right, but the garage plays tricks on your eyes so we got it backwards.
I think it's ok.
A bigger skeg might be useful.
Per the instructions I started with a 2x4 and cut it into a wedge which was faired in heavily with epoxy.
We had three people in the boat and I think it is intended for two or less.
With two adults and a child on board we had about 8 inches of freeboard left.
That should be ok but with it being so tippy we almost used that up a couple of times.
Really the wide gunnel saved us from shipping water on more than one occasion.
Full disclosure - I'm a healthy 250 lbs. so she was carrying at least 500 pounds!
Probably more.
I also found the oarlocks to be too low for me and I would either raise them or lower the seat if I did another.
I kept hitting my knees on the return stroke and eventually I knocked one of them out of the lock, breaking the scotty oar collar and pulling the little nails out of the oar.
I found 8 foot oars online though most formulas call for another 6 inches of oar.
I would agree that longer oars would have been better here.
Maybe even 9 foot.
It rowed so much more smoothly with less inboard oar after I broke the collar!
In the future we may raise the line of the gunnel.
Haven't decided.
That line is so pretty...
Building this boat was a great experience and we really enjoyed it.
It's beautiful and gets lots of attention.
8 weeks and 3 days was probably too fast but we think it was worth it.
If we do another it will probably be a northeaster or other more stable design.
I don't know what this boat weighs but two people can move it with effort.
Probably under 200 pounds.
As she sits she is certainly not a car topper.
Thanks again for the website!
I wish you the best.
Want to add more photos?
Photo Uploader
If you are having problems uploading Photos or would like to add more click on this link for the Upload Form.


