- Home
- Boat Building
- Restoration
- Keel
- Keel Rust
- Concrete Keel
Concrete Keel Ballast
A concrete keel has successfully been used to ballast many boats.
Concrete is a cheaper, easier and less dangerous alternative for the home builder to make their own ballast keel
Personally, I believe that if you can afford it, lead or cast iron is the better option and the resale value of your boat will be higher.
However, the idea of handling the amount of molten lead needed to make a throat is just too scary to consider and getting one cast professionally is expensive.
And a cast iron keel will, have to be cast in a foundry.
The alternative for the home builder is to cast the throat in concrete with scrap metal embedded to give it extra weight and strength.
It's not any simpler to cast than lead but it is a dam site less dangerous and it is cheaper.
And for most home builders that's more important.
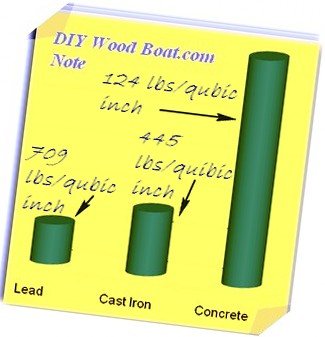
Weight comparisons.
The main problem with concrete is that is is so much less dense than lead or cast iron.
This means that to have the same weight you will need approximately 5.5 time more volume of concrete than lead.
The usual method for increasing the weight of the concrete keel is to add scrap iron into the mix.
But even with scrap you will still need somewhere in the region of two to three times the volume of a lead keel.
However, compensation can be made by adding supplementary ballast inside the hull.
Mold Construction.
How you determine the shape and size of the concrete keel will depend on whether you are building from scratch or replacing an old keel.
The first job is to build a mold.
This is done in a similar way to how they use shuttering to make concrete buildings.
The shuttering can be made from scrap or cheap plywood, the thickness will need to be sufficient to support the weight of concrete which will depend on the size of the throat.
You'll also need a plywood template of the underside of the wooden keel with the keel bolt ole positions etc.
If you use wooden triangular slats to support the inside corners of the shuttering this will make getting a nicely rounded edges easier when the throat has set.
Nailing 2 x 4s around the outside of the mold will help support the shuttering keep it square and prevent sag.
The Concrete
One of the great advantages of using concrete is its availability.
Easily available from any building supply yard and you can even have it delivered ready mixed.
However, mixing it yourself will be most people's option.
Rent or borrow a cement mixer if you do not own one, and you will need a wheelbarrow.
The cement used to build ferro-cement boats or for marine construction is normally a slow setting cement to which are added graded fines and a latex bonding agent to make it impervious to water.
However, for our throat, Portland cement is fine after all it has been used as a sealer and as a seam compound.
The preferred concrete mix and whether to mix it dry or wet Is open to debate.
However, at good concrete mix is, four parts sand, one part pea gravel, and one part cement.
For pouring, a runny mix will flow more easily around all the metal in the casting.
It's a good idea to start with a skin of concrete about 1 inch / 25mm thick on the inside of the mold before adding the reinforcing bars and scrap ballast.
When you do start pouring have someone to help spread it and jiggle and poke it with a stick to make sure it's really flowing everywhere.
As with any concrete work, the whole casting must be filled in one pour.
Once finished, cover your concrete keel with wet sacking or an old carpet to keep ft damp for a few days.
Then allow a couple of weeks before attempting to move or fit it.
The Reinforcing and Ballast.
The metal you add to the concrete keel should preferably be well rusted and free of oil or galvanizing.
If any of the metal has a metal coating or galvanizing, then a small amount of chromium trioxide added to the water will prevent any chemical reacting with the cement and prevent bubbles forming.
You'll want to reinforce the throat with as much reinforcing bar and mesh as you can fit in.
For the 'scrap' ballast, it will depend on what you can source and how much room there is.
An old favorite used to be lengths of railway line laid full length for weight and strength.
However, small pieces such as old rivets, boiler 'punchings' or 'mill ends' will be easier to cram in evenly into small spaces.
To get the weight and metal distributed evenly, pour an inch of concrete, lay In some metal, cover ii with concrete, then lay in more metal and build up in layers.
Wire some of the reinforcing bar together then the rest can be packed loose as the concrete will hold things together.
Keel Bolts.
It will be impossible to drill through your keel once it had set.
All those metal chunks will throw the drill bit off.
So, the keel bolts or the holes for the bolts must be cast into the keel.
the template you made of the wooden keel with the bolt positions can be used to align the hole or bolt positions at the top of your mold.
If you are casting the bolts into the concrete keel the lower ends want to be wired to the reinforcing or passed through a longitudinal bar.
If you intend to pass the bolts through holes then lengths of doweling of the hole diameter can be cast into the throat.
It will then be a simple job to drill out the wood once the throat is properly set.
affiliate linksConcrete Keel Waterproofing.
When the concrete keel has been given a couple of weeks to harden through it can be plastered and ground smooth.
But before fitting it to your boat it needs to be waterproofed.
In the old days lots of red lead and tar were quite sufficient.
These days epoxy resin and plenty of paint might be a better option you could even use a layer of glass cloth.
It is also important to seal the joint between the concrete keel and the wood keel well.


