- Home
- Boat Building
- Restoration
- Glue
- Applying Glass Cloth
- Epoxy Resin
- Stitch and Glue
- Lapstrake Clamping Aid
Medina Scow Dinghy. Plans and Patterns
by John Sheen
(Isle of Wight U K.)

An easy to build epoxy/ply classic design.
Build time about 120hrs.
Detailed building instructions and FULL SIZE PATTERNS.
Register your interest at www.sailnoar.com, Self Build Small Boat Plans and Patterns.
Other plans coming soon
- Power Skiff,
- Pram Dinghy,
- A Wherry Dayboat and a
- Barge Yacht
Comments for Medina Scow Dinghy. Plans and Patterns
|
||
|
||
|
||
|
||
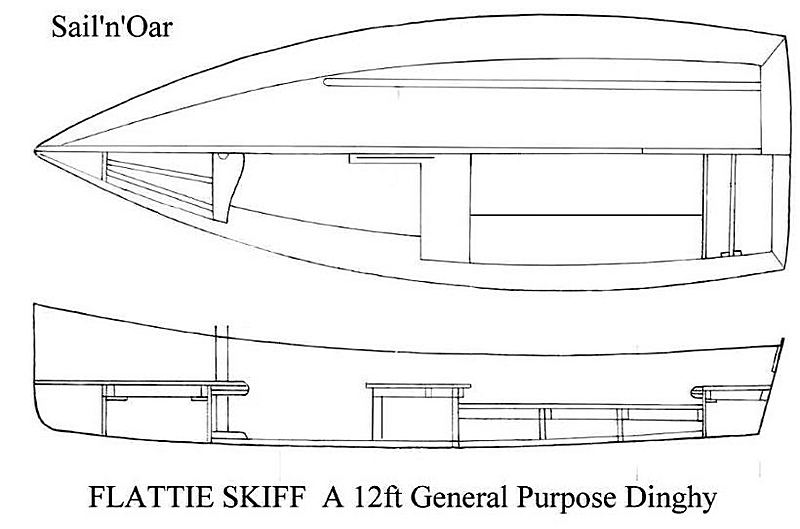
Sail’n’Oar Flattie Skiff
by John Sheen
(Isle of Wight U K.)
Sail’n’Oar Flattie Skiff, an easy to build boat.
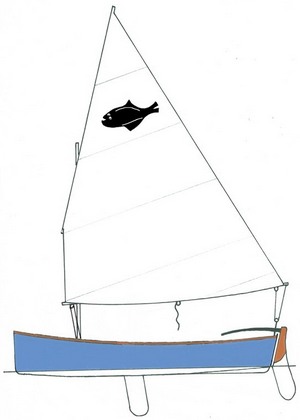
This 12ft skiff is an ideal family boat.
- She is very safe, stable and seaworthy.
- Sparkling sailing performance.
- Easy to row, and can be motored.
- Easy to follow build instructions.
- With tool and timber requirement.
Full plans/manual package + photos.
Plans and Manual GBP 55.00.
Build cost complete GBP 1100.00,
Includes sail, spars and fittings.
This is my latest "Easy to build boat", which I'm introducing at the Beale Park Boat and Outdoor Show, on the 2nd to 4th June 2017, at Beale Park, Pangbourne, Berkshire, UK
Comments for Sail’n’Oar Flattie Skiff
|
||
|
||
A new boat and a new tip.
by John Sheen
(Isle of Wight, UK)

I am using this simple arrangement on my latest “Easy to Build Design”.
She is a 12 foot skiff for general purpose but mainly for sailing.
The idea is to be able to allow most rain water to drain whilst propped up on a trolley in the dinghy park or in the yard, if there is no cover.
Secondly, with bungs removed, we have a self draining cockpit.
It won’t empty completely but might save a lot of bailing!!
It’s a lot cheaper than factory made self bailers.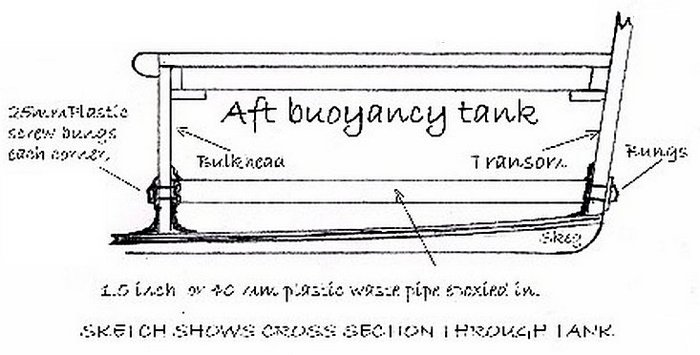
Lifting Keel
by John Sheen
(Isle of Wight, UK)
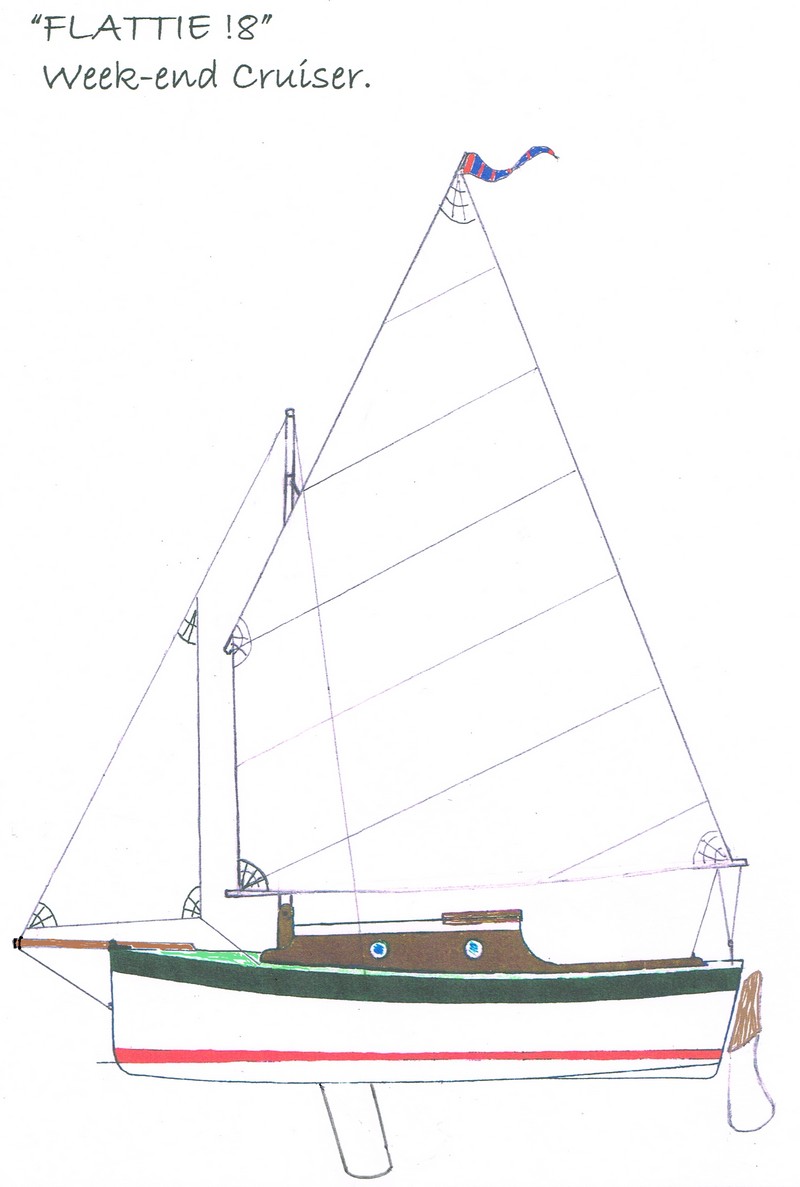 I'm
I'm
working on the design for an 18ft trailer/sailer for DIY builders.
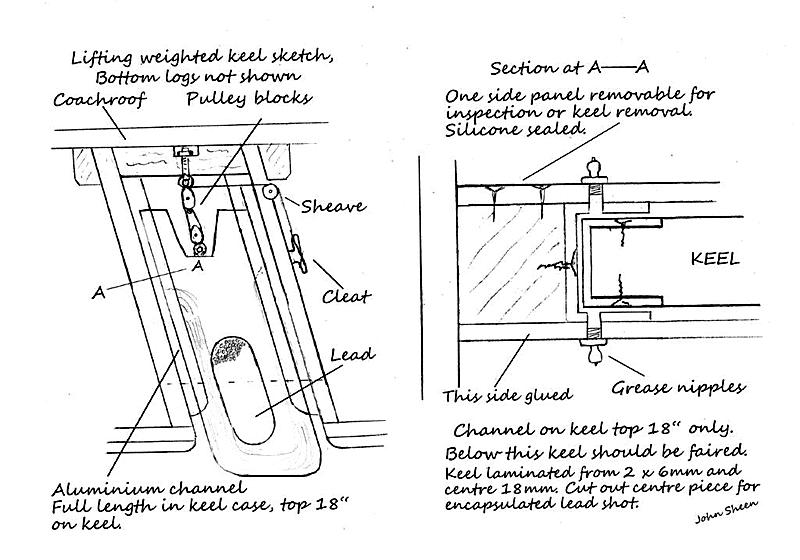
As readers will be aware a centreboard case takes up valuable
cabin space and bilge or fixed keels can make recovery to a trailer
awkward.
Therefore, I've decided on a lifting and weighted dagger
board.
It’s a simple arrangement easily constructed and managed.
Comments for Lifting Keel
|
||
|
||
|
||
DIY Sliding Hatch
by John Sheen
(Isle of Wight, UK)
Here is an alternative to the published sliding hatch which might be of interest.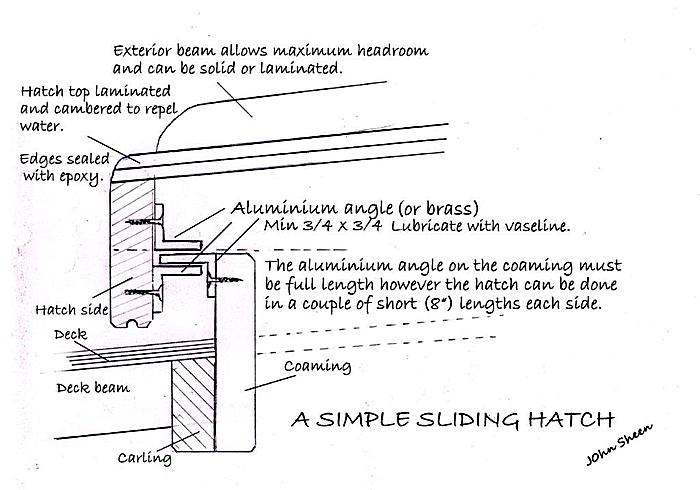
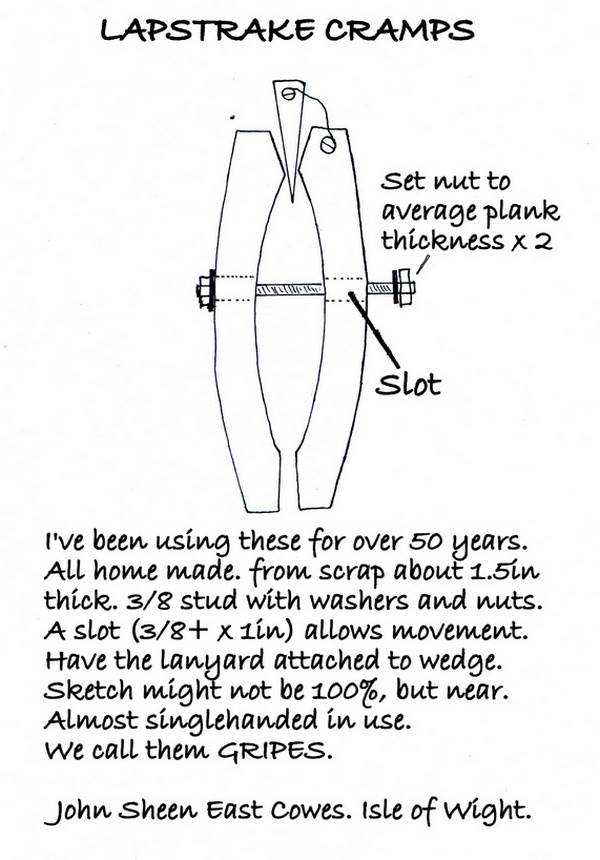
Lapstrake Cramps
by John Sheen
(East Cowes)
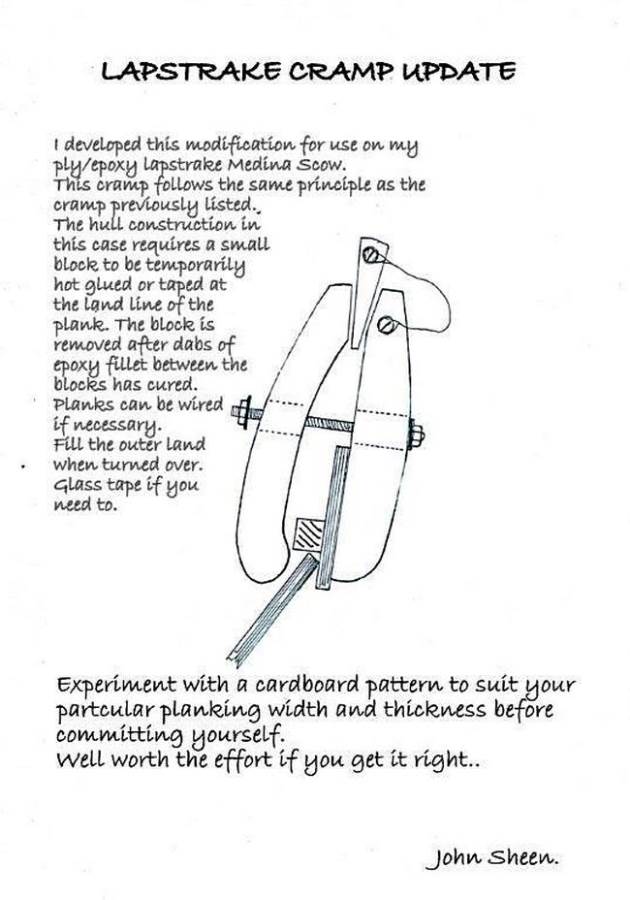
Lapstrake Cramp Update
by John Sheen
(East Cowes, IOW, UK)
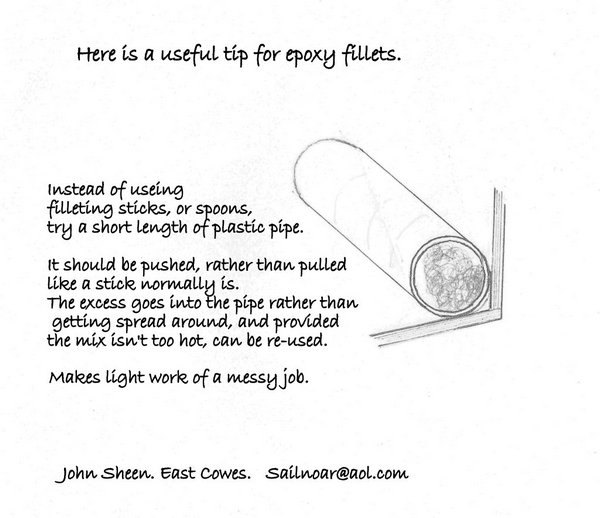
Epoxy Fillets
by John Sheen
(East Cowes)
Comments for Epoxy Fillets
|
||
|
||
|
||
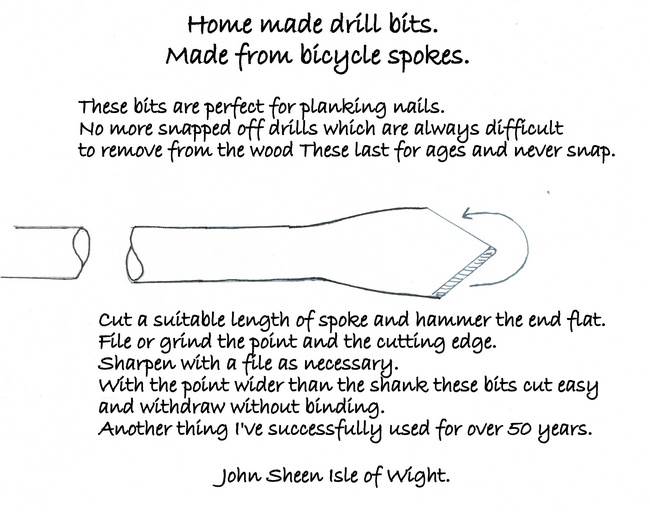
DIY Drilling Bits from Cycle Spokes
by John Sheen
(IOW UK)
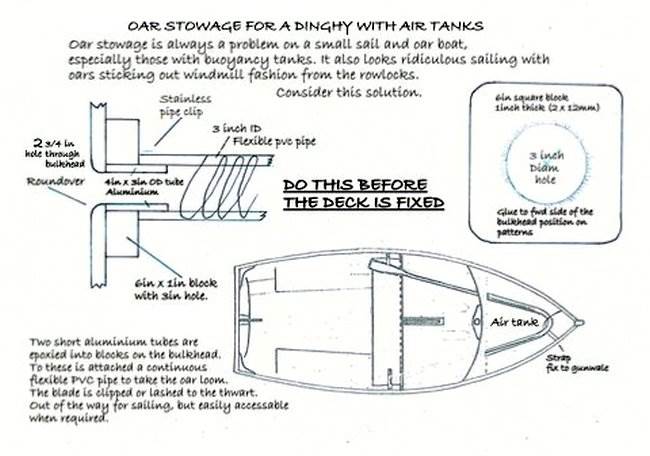
Oar Storage for a Dinghy with Air Tanks
by John Sheen
(IOW, UK)
Joining Plywood Sheets and Planks
by John Sheen
(Isle of Wight, UK)
Joining 4 and 6 mm plywood sheets by either the scarf method or the epoxy/glass butt joint is not as difficult as it might at first appear.
Personally I favour the butt joint for the amateur builder because it is the easiest and quickest.
It is also very strong and requires minimum skill.
Whilst the scarf joint is traditional in boatbuilding, even before glues were used (paint and clenched or turned nails) the modern materials allow simpler methods to be used and a stronger joint created.
Lapstrake is eminently suitable for the use of epoxy/glass butt joint because the finished planks are quite narrow and the overlap of the planks at the lands are consequently close together.
Not only does this give a thickness which is at least twice the thickness of the plank, the filled lands both inside and especially outside, have the effect of forming continuous longitudinal stringers from stem to stern.
The glass tape becomes almost invisible when saturated with the epoxy resin and a bright finish is possible with care in faring the tapes.
The joint can be made with the full and half sheets or with individual planks which have been previously cut.
Thought should be given to the building space available to you.
Plywood Butt Joint.
Full Sheets or Planks
The joint is made as shown in the sketch.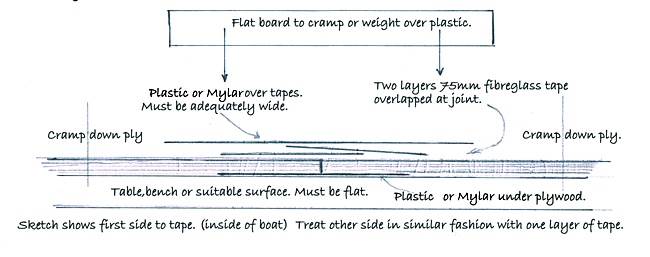
The base surface must be clean and flat.
Lay the plastic on the base and position the plywood with epoxy in the butting edges.
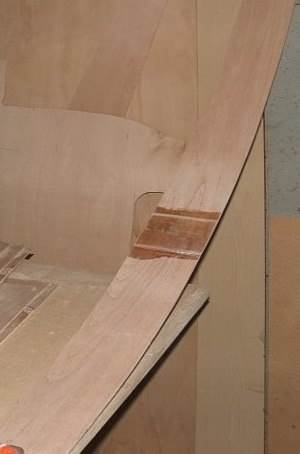
The plank will
retain a fare curve and be strong
Cramp the plywood to the base making sure there is no step between the ply sheets.
Wet out two 75mm fibreglass tapes, overlapped as shown.
Squeegee excess resin out.
Cover with plastic or Mylar wider than the tapes.
Roll with rubber or flexible tool.
Cramp or weigh down with a suitable flat board, and allow 24hr to cure.
Remove cramp board and plastic.
Sand the surface flush, do not remove glass, only fair the edges.
Cramp battens to the edges and turn the sheet over.
Apply one tape to other side.
Repeat the operation with another sheet or plank.
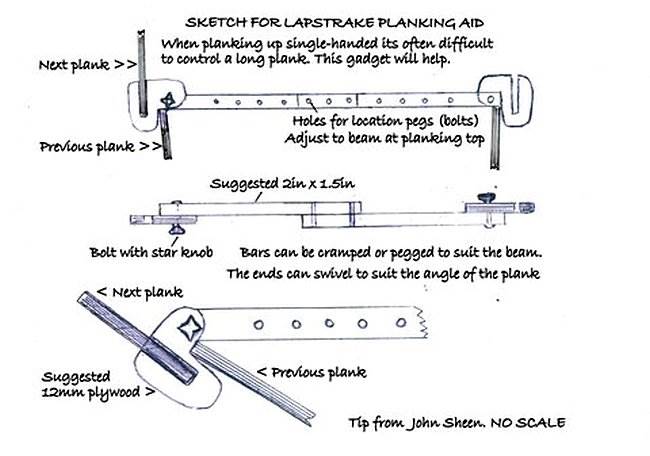
Lapstrake Clamping Aid
by John Sheen
(Isle of Wight, UK)
This gadget is designed as an aid when building the boat the right way up.
Want to add more photos?
Photo Uploader
If you are having problems uploading Photos or would like to add more click on this link for the Upload Form.


