- Home
- Your Boats
- Handrails
Handrails, Grab rails and Toe rails
Plenty of handrails / grab rails and a good stout toe-rail are essential safety features on any boat.
The old saying “One hand for yourself and one for the boat” is just as relevant today as it was in the old days of the sailing ship.
On a wooden boat they can also enhance her looks.
A well made grab rail or toe rail can also be a decorative feature, providing some of those all important finishing touches which, can turn even the plainest of boats into a thing of beauty.
Safety.
"I grew to judge every purchase by how many bronze screws I could buy for the boat if I did not spend on this or made do without that."
(Lin Pardey)
As I have already said a plentiful supply of convenient hand holds is an essential feature on any boat.
And that goes for below decks as well as above.
They are not only to help keep you and your crew from going overboard but to prevent falls and generally to keep you from sliding around.
They can also be handy places to secure items of gear, providing that doesn’t interfere with their primary purpose.
And on deck, a good
stout toe rail is as
important as a non-slip surface to prevent feet from slipping off the
deck edge.
Handrails need to be placed where they are easy to grab, especially for anyone using the side-decks.
Below decks there is especial need for good handholds near the galley but it should be possible to reach one from anywhere within the cabin.
However, they are best placed away for the centreline of the deck-head as this could interfere with headroom.
As for those so called ‘guard rails’ which nearly all modern pleasure boats are fitted with, most are more of a hazard than an asset.
If you have small children or pets on board then the guard rail is and ideal place to hang netting to keep those precious little ones on board.
However, for adults, with that wire at knee height they are surely more of a problem than a help.
If someone were to propose building a public foot bridge over a river with similar ‘guard rails’ they wouldn’t be allowed, it would contravene health and safety rules, and quite rightly too.
So why disfigure your lovely wooden boat?
Much better to have plenty of handrails grab rails a toe rail and jackstays where you can clip on your harness.
Handrail Construction.
 DIY Boat Handrails
When I was rebuilding Mignonne I was constantly looking at other boats for ideas that were not only useful but would be simple to make.
The toe rail I made was based on one I saw on a lovely little clinker cruiser.
Not only did it look right, it did the job it was meant to, seemed simple to build and didn’t interfere with deck drainage.
When I was fiddling with off cuts to determine the dimensions I realized that the same basic construction and size would be perfect for the handrails.
And using the same sizes and style has helped give her a more harmonious, finished look.
I used ash because of its strength to weight ratio and because it was available in nice straight grained lengths.
The toe rails and grab rails were all made from 1inch/25mm square lumber.
The spacers used to raise the rail were short lengths cut from the same stock.
The intermediate spacers I cut 1.5inch/40mm long and the end spacers 6inch/150mm.
I also found that 1inch/25mm square section was relatively easy to cold bend to follow the curvature of the deck and the sheer.
The two long lengths run from just abaft the forward fairleads to just forward of the center cleat.
Then there is a short length from just abaft of the center cleat to the taffrail.
The open nature of the rail means deck water is allowed to drain quickly away.
And the dimensions are perfect as grab rails even when wearing gloves.
The distance between the spacers on the toe rail is a matter of judgment, depending on the amount of curvature as well as aesthetic considerations.
On Mignonne the toe-rail was fastened down onto the quite substantial sheer clamp.
The spacers for the grab rails on the cabin tops were positioned so that they could be fastened to the underlying beams.
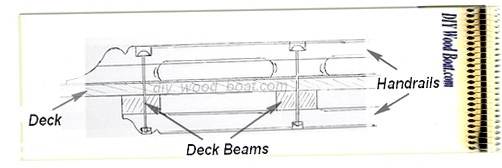
Below decks the handrails were fastened directly to the deck beams without the need for spacers.
The below decks handrails on the deck-head of the main cabin were positioned directly below the handrail on the deck above.
That way the through fastening bolts were able to go through both rails with the deck and beam sandwiched between.
Fastening and Finishing.
While a grab rail and toe rail can be decorative features they are essentially there for your and your crew’s safety and should be fastened securely.
It is surprising how much force falling person can exert on a quickly grabbed handrail.
Use as many through bolts as is practical especially at the ends.
Where the bolt doesn’t go through a deck beam, use a backing plate to help spread the load.
Beveling the corners of the rail will give it a more professional look as well as making it more comfortable to hold.
And a little bit of shaping on the corners of the spacers with a round rasp as well as improving the look will give a more varnish friendly surface. Varnish doesn’t like sharp corners.
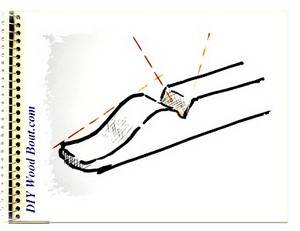
Those longer spacers at the ends will allow plenty of room to finish off the rail with a bird beak.
While handrails, grab rails and toe rails can have more than one role such as a convenient place to tie fenders to, so other items of boat furniture can double up as grab rails.
The fiddles around the edge of tables and work surfaces which, are designed to stop items rolling off, can if made strong enough and securely fastened be very convenient handrails.
Equally any vertical post such as a mast support should be designed the need for and holds in mind.
The more convenient grab rails you can incorporate the safer you and your crew will be.
Previous posts
See What Others Have Posted
Fastening teak hand/toe rails to deck.
What is the best way to fasten teak hand/toe rails to the fore-deck?
I have 6mm 316grade s/s lag screws that I planned to screw and epoxy into the bases …
